
Microscopy: Modes, Magnification, and Imaging with Special Contrast Techniques Like DIC, Polarized Light etc
1 Introduction
The ability to observe samples at the micro- and nanoscale using microscopy makes it a crucial tool in many scientific disciplines. This theory explores the fundamentals and uses of microscopy with an emphasis on imaging methods like Polarised Light Microscopy and Differential Interference Contrast (DIC) Microscopy.
2 Brightfield Microscopy
The most popular and fundamental type of optical microscopy is brightfield microscopy. This mode allows for the visualisation of sample structures by illuminating the sample with white light and producing a picture that depicts variations in light absorption and scattering. Figure 1 shows the image of a Bright Field Microscope.
.png)
2.1 Principle
Brightfield microscopy operates on the principle of transmitted light, where visible white light is passed through a specimen. As the light travels through, it is scattered or absorbed to varying degrees by different components of the sample. The resulting contrast and visibility of internal structures depend on these interactions. Since unstained specimens typically exhibit low intrinsic contrast, staining is often necessary to enhance the visualization of specific features.
Staining is a technique used in microscopy to enhance the contrast of specimens, particularly biological tissues or cells, making specific structures more visible under the microscope. It involves applying colored chemical dyes that selectively bind to certain components, such as the nucleus, cell wall, or cytoplasm, depending on their chemical properties. By increasing contrast between different cellular structures, staining helps in identifying, differentiating, and analyzing morphological features that might otherwise be difficult to distinguish in unstained specimens.
Instead of staining with dyes, metallographers use chemical or electrolytic etching to reveal microstructural features of metals and alloys after polishing the sample. This process selectively corrodes different phases or grain boundaries, enhancing contrast so that features like grain size, phase distribution, and inclusions become visible under an optical or electron microscope.
2.2 Components: Brightfield microscopes are made up of several essential parts, including
- Illuminator
The light source that produces white light for the specimen, usually a halogen lamp or an LED. - Condenser Lens
To ensure even illumination, the condenser lens concentrates and directs the light onto the specimen.
- Stage for Specimen
The stage ensures accurate positioning by permitting only horizontal movement, while vertical movement is controlled through the coarse and fine adjustments of the arm/head. - Objective Lens
The objective lens is the primary lens that gathers and magnifies the light flowing through the specimen. It oversees creating the initial image. - Eyepiece
The eyepiece lens enlarges the image created by the objective lens so that the viewer may examine and evaluate the specimen. - Eyepiece tube and body tube
The eyepiece lens is held in place by the eyepiece tube and body tube, which also serve as the image's optical route. - Focus Mechanism
Brightfield microscopes contain a fine and coarse focus mechanism to bring the specimen into clear focus.
2.3 Advantages
- Simplicity
Brightfield microscopy is simple to set up and use, making it appropriate for educational applications and everyday laboratory work. - Versatility
It can be applied to stained and unstained samples, allowing for a wide range of sample types.
- Live cell observation:
Brightfield microscopy is a crucial tool in biology and microbiology because it allows observation of living cells and tissues.
- High Resolution imaging:
Modern brightfield microscopes, particularly those with oil-immersion objectives, can capture great-resolution images.
2.4 Limitations
- Low Contrast
Unstained specimens frequently don't have enough contrast, which makes it challenging to see minute details. - Sample preparation
Staining or other contrast-enhancing methods may be necessary for specimens, which can change the sample.
- Limitations with Thick Specimens
Brightfield microscopy is not recommended for thick or opaque specimens because these materials might scatter light and cause image quality to suffer. - No 3-D information
The lack of 3D information makes it difficult to see the three-dimensional structure of samples because it only gives a 2D image.
3 Darkfield Microscopy
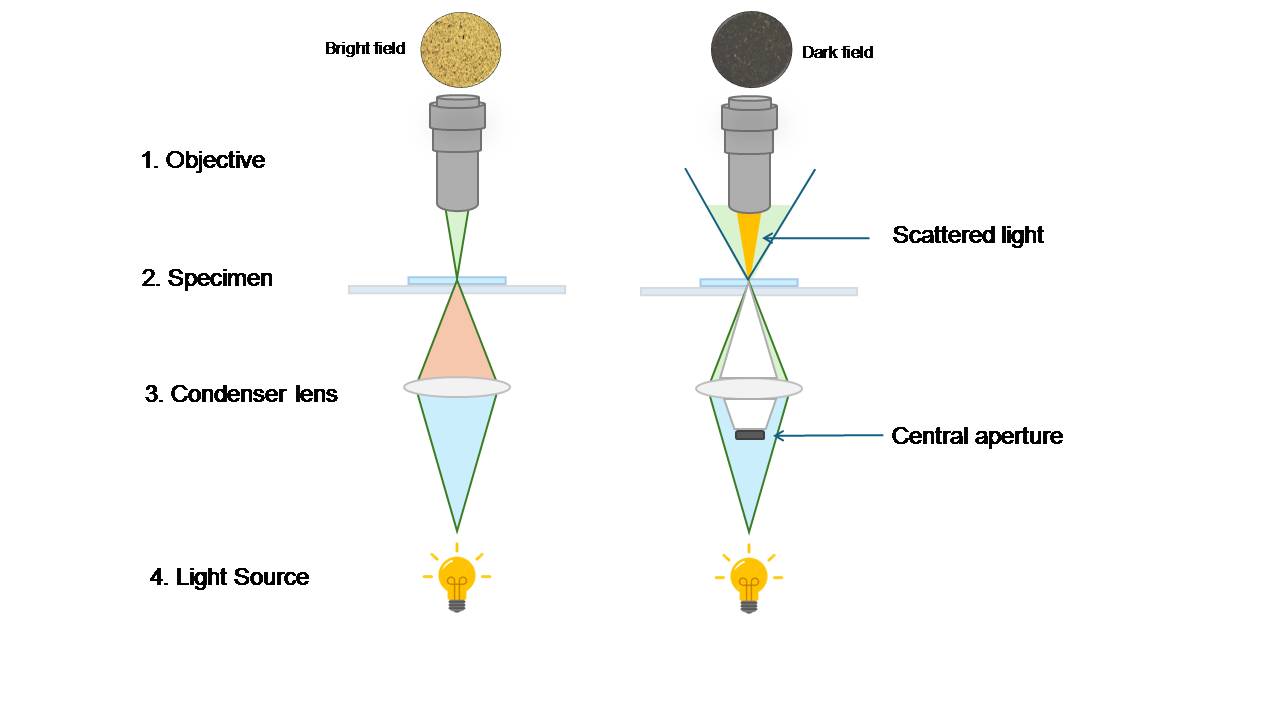
Transparent or low-contrast specimens can be seen and contrasted more clearly using the optical microscopy technique known as darkfield microscopy. Darkfield microscopy illuminates the sample with oblique or scattered light, producing a bright image against a dark background, as opposed to brightfield microscopy, which illuminates the specimen with a bright background. In addition to minuscule particles, germs, and other transparent objects, this method is particularly helpful for studying live and unstained biological specimens.
3.1 Principle
The basic idea behind darkfield microscopy is to use a condenser specifically created to block the main, unscattered light beam. On the other hand, only light that is refracted or dispersed by the specimen enters the objective lens. The result is a brilliant image on a dark background thanks to the capturing of this scattered light. Transparent or translucent specimens are easier to see against a dark background, which improves contrast and resolution.
3.2 Components
- Condenser with Darkfield Stop:
The condenser features a darkfield stop, a spherical disc close to the condenser lens that filters out the light from the center. Only the dispersed or refracted light can pass through due to its construction. - Objective Lens
Darkfield microscopy uses objective lenses to magnify the scattered light and provide a magnified image of the specimen, just like other microscopy methods do. - Stage for the Specimen:
For exact positioning, the specimen is placed on a stage like that used in brightfield microscopy.
- Light Source
The illumination is provided by a strong light source, typically a halogen lamp or LED. This light is shone first on the condenser and subsequently on the sample.
• Bright field Illuminator : The light source that produces white light for the specimen, usually a halogen lamp or an LED. Light from the illuminator passes directly through the sample and into the objective lens. Features that absorb or scatter light appear darker than the bright background.
• Dark Field Illuminator : The light source that produces white light for the specimen, usually a halogen lamp or an LED. The sample is illuminated from the sides (at an oblique angle) using a special dark field condenser. The background appears black, and only features that scatter light (like edges, inclusions, or fine particles) appear bright.
3.3 Advantages
- High Contrast
High-contrast pictures produced by darkfield microscopy help see translucent or low-contrast material without staining. - Live Cell Observation
This technique preserves the integrity and viability of living cells and microorganisms by allowing for observation in their unaltered natural condition without needing fixation or staining. It is particularly valuable in biology.
- Enhanced Visibility
Against the black background, minute features, such as germs, dust particles, and microscopic organisms, become extremely apparent, enabling careful inspection and analysis. - No staining required
Darkfield microscopy does not require staining, in contrast to brightfield microscopy, protecting the specimen's original properties.
3.4 Limitations
- Limited Depth of Field:
Darkfield microscopy frequently has a limited depth of field, making it challenging to see three-dimensional structures in thick specimens. - Specialized equipment
Darkfield microscopy is slightly more sophisticated than brightfield because it requires specialized condensers and objectives.
3.5 Applications
- Microbiology:
To observe live bacteria, spirochetes, and other microorganisms for research and diagnosis, darkfield microscopy is frequently employed in this field. - Nanotechnology:
Researchers can visualize the characteristics and behavior of nanoparticles and nanomaterials by using nanotechnology. - Pharmaceuticals:
Drug particles, microcrystals, and other pharmaceutical components can be analyzed using darkfield microscopy. - Materials Science:
Examining minute particles, flaws, and impurities in materials is done in material science.
4 Phase Contrast Microscopy
This technique is good for looking at transparent specimens like living cells. It produces high contrast images of phase objects by taking advantage of variations in the phase of light travelling through the sample.
4.1 Principle
The foundation of phase contrast microscopy is that light undergoes a phase shift when it passes through a transparent or semi-transparent specimen. However, using a conventional brightfield microscope, this phase change is invisible to the naked eye. In phase contrast microscopy, these phase discrepancies are converted into intensity differences using various optical components, creating a contrasted image.
4.2 Components
- Phase Plate
The phase plate positioned in the condenser is a crucial part of phase contrast microscopy. Light going through the phase plate has a phase shift, usually a quarter wavelength out of phase. Phase discrepancies become amplitude differences because of this phase shift. - Annular Aperture
The annular aperture in the objective lens regulates the angles at which light enters the objective. This aperture receives light that is directed through the specimen, which enhances the phase contrast effect. - Objective Lens
Phase contrast microscopy uses an objective lens, much like other microscopes, to gather and enlarge the light emitted by the specimen. - Eyepiece Lens
By enlarging the picture even more, the eyepiece lets the viewer view the specimen with the chosen overall magnification.
4.3 Advantages
- Enhanced Contrast
Phase contrast microscopy is the best technique to observe live cells, cell organelles, and other transparent biological materials without staining because it dramatically improves contrast and visibility for transparent specimens. - Live Cell Observation
This technique is particularly useful in cell biology because it enables scientists to view living cells in their natural form without creating artifacts from staining.
- No Sample Preparation
Phase contrast microscopy does not require additional sample preparation, in contrast to staining methods, which can change the material's properties. - High Resolution:
Phase contrast microscopy produces high-resolution images that allow observing minute cellular details.
4.4 Limitations
- Phase contrast microscopy is more expensive and sophisticated than brightfield microscopy because it requires specialized optics and phase plates.
- Artifacts and Halos: The process can create halo-like artifacts around the specimen's high-contrast edges or structures.
4.5 Applications
- Cell Biology
Phase contrast microscopy is frequently employed in cell biology to observe dynamic processes, subcellular structures, and living cells. - Microbiology
It is essential for researching microorganisms in their natural environments, such as bacteria, algae, and protozoa. - Developmental Biology
Phase contrast microscopy is used to track embryonic development and cell differentiation in developmental biology. - Materials Science
Materials science examines transparent materials, including microfluidic devices and polymers.
5 Differential Interference Contrast (DIC) Microscopy:
A sophisticated method that improves contrast and displays subtle differences in a sample's optical path length is contrast microscopy or DIC. It splits a light beam into two to induce a phase shift and sends one through the sample and the other through an optical route. Images produced show how the sample's thickness and relief vary.
5.1 Principle
The basis of DIC microscopy is that polarised light and the specimen interact to produce interference patterns. This method divides a white light beam into two beams that vibrate perpendicular to one another using a polarising beam splitter, prisms, and specialized objectives. After traversing the specimen, these two beams are recombined to produce an interference pattern translated into an image. Differences in optical path length and refractive index, which show tiny specimen details, give rise to the final image.
5.2 Components
DIC Microscope involves a set of specialized optical components:
- Polarizer
The polarizer produces A linearly polarised beam, which polarises the light source into a single plane of vibration. - Beam Splitter:
The linearly polarised light is divided into two orthogonally polarised beams by a polarising beam splitter cube. - Prisms
These prisms cause a phase difference between the two split beams by introducing a lateral shear between them. - Nomarski prism
The two beams are recombined using Nomarski prisms, also called Wollaston prisms, after passing through the specimen. These prisms recombine the beams, making phase discrepancies in the sample more visible. - Objective Lens
The objective lens is a key component that collects the recombined beams and creates an interference pattern that the eyepiece then images.
6 Polarized Light Microscopy
It is a type of microscopy that uses polarized light to enhance the contrast of samples, making it easier to observe certain materials or structures. This technique is particularly useful for studying materials that have optical properties, such as crystals, minerals, or biological tissues, which can interact with light in unique ways. The sample’s unique interaction with the polarized light allows features like crystals, fibers, or other structures to become visible, often showing up with bright colors or patterns, which helps in distinguishing them from the background.
6.1 Principle
This microscopy takes advantage of is birefringence, a property exhibited by certain materials. Birefringent materials cause polarized light to split into two rays, each traveling at different speeds and in slightly different directions. These rays recombine when they exit the material but are now polarized at different angles. As a result, the light exiting the sample may be altered in terms of its intensity, polarization, or color.
6.2 Components
Light source: The light emitted is typically unpolarized, i.e. light waves vibrate in all directions.
Polarizer: In polarized light microscopy, light from the microscope’s light source passes through a special optical filter called a polarizer. This polarizer converts the light into light waves that oscillate in only one direction (plane-polarized light). Thus, it allows light waves oscillating in one plane (direction) to pass through.
Sample: The polarized light then passes through the sample being examined. Materials within the sample that have special optical properties—such as birefringence (the ability to split light into two rays)—will interact with the light differently.
Analyzer: After passing through the sample, the light passes through a second filter called an analyzer, which is usually placed perpendicular to the polarizer. The analyzer blocks the light unless it has been altered by the sample. If the sample has induced changes in the light’s polarization (such as rotation or splitting), the analyzer will allow these modified light rays to pass through, thus revealing the sample's internal structure and properties.
6.3 Applications
Polarized microscopy takes advantage of birefringence, a property exhibited by certain materials. Birefringent materials cause polarized light to split into two rays, each travelling at different speeds and in slightly different directions. These rays recombine when they exit the material but are now polarized at different angles. As a result, the light exiting the sample may be altered in terms of its intensity, polarization, or color.
6.4 Advantages of Polarized Light Microscopy
- Non-destructive: Polarized light microscopy is a non-invasive method, meaning that samples can be analyzed without being damaged.
- Enhanced Contrast: It provides excellent contrast for birefringent materials that would otherwise be hard to see under regular light microscopy.
- Identification of Materials: Polarized light microscopy allows for the identification of specific materials based on their optical properties, such as crystalline structures.
7 Magnification
The interaction of the objective and eyepiece lenses in a microscope produces varying magnification. Multiplying the objective magnification by the eyepiece magnification yields the total magnification. Higher magnifications make finer details more visible but can also reduce the depth of focus and field of view.
7.1 Principle
The interaction of light with lenses or other optical elements is the foundation of the microscope magnification principle. The ability to magnify and project a specimen onto an image plane—typically a camera or the eyepiece for visual observation—requires that light rays from the specimen be refracted (bent) as they pass through a succession of lenses.
7.2 Components of Magnification
- Objective lens
The primary lens in a microscope is called the objective lens. It is responsible for gathering and magnifying the light that enters the specimen. The numerical aperture (NA), which affects the lens's resolving capacity, and the magnification power are typically used to pick the objective lens. - Eyepiece Lens
The eyepiece lens, often called the ocular, is a magnifying lens attached to the top of the microscope and is used to enlarge the image created by the objective lens. The sum of the magnifications of the objective and eyepiece lenses determines the overall magnification. - Tube Length
To guarantee appropriate image formation, the distance between the objective lens and the eyepiece lens, also known as the tube length, is standardized in microscopes. A typical tube length is between 160 and 170 mm.
7.3 Types of Magnification
- Optical Magnification
When a specimen appears to grow when examined under a microscope, this is referred to as optical magnification. It is computed by multiplying the eyepiece lens' magnification with the objective lens'. For instance, a 10x objective and 10x eyepiece would result in a total optical magnification of 10x X 10x = 100x. - Total Magnification
The level of enlargement the microscope achieves is called total magnification. Both optical magnification and any additional magnification offered by the camera or detector are considered. Most of the time, total magnification is more than optical magnification.
7.4 Significance of Magnification
- Resolution
The quality of the image cannot be determined solely by magnification. Resolution, or the capacity to tell apart two objects that are close together, is also essential. High magnification is advantageous, but it needs to be combined with the right resolution to display tiny details. - Observation
Whether viewing biological specimens, nanomaterials, or other tiny things, magnification is crucial for seeing microscopic structures. It enables studying various things, including particles, crystals, bacteria, and more. - Scientific growth
Magnification is essential to the growth of science. It has been helpful in subfields like nanotechnology, materials science, and biology.