
Advanced Ceramography Techniques: Preparation and Analysis of Ceramic Microstructures
Ceramography is the study of the microstructure of ceramic materials using microscopy. It involves the art and science of preparing, interpreting, and analyzing microstructures in ceramics to better understand their behavior and performance. This method is widely used in various industries, including aerospace, electronics, biomedical, and structural applications. It is essential for quality control, failure analysis, and research into advanced ceramic materials.
A well-prepared ceramographic specimen should be:
- A representative sample that accurately reflects the microstructure of the bulk material.
- Sectioned, ground, and polished to minimize surface damage and deformation, ensuring the true microstructure is revealed during etching.
- Free from polishing scratches, pits, and contamination to avoid misinterpreting the microstructure.
- Flat and well-polished to allow accurate examination under an optical microscope, SEM, or other advanced characterization techniques.
Preparing ceramic samples for ceramography involves several critical stages to ensure high-quality microstructural analysis. The major stages include-
• Sawing
• Mounting
• Grinding
• Polishing
• Etching
• Microscopy and Analysis
Sample preparation : The first step in ceramography involves the careful preparation of samples for microscopic analysis. This includes sawing, mounting, grinding, polishing, and etching the ceramic specimens to reveal their internal microstructure without inducing artifacts.
Precision cutting tools, diamond saws, and abrasive slurries are commonly used for sectioning ceramics, ensuring minimal damage to the material’s structure. Mounting the samples in resin or epoxy provides stability during subsequent grinding and polishing stages.
1 Sawing :
Sawing is carried out to obtain a representative section of a ceramic component for subsequent polishing and microscopic examination, or to isolate a specific region of interest. The operation must be performed with care to minimize the introduction of damage such as cracking, chipping, or surface flaws, thereby preserving the structural integrity of the specimen for ceramographic analysis.
Ceramic specimens should be sectioned using a high-speed cut-off machine equipped with a water-cooled, low-density, metal-bonded diamond wafering blade (Fig. 1(a)). In certain cases, a resin-bonded diamond blade may be preferable depending on the material characteristics. For dense ceramics, a normal load of approximately 5–10 N (500–1000 gf) and a blade rotation speed of 2000–5000 rpm are recommended. For refractories, concrete, and semiconductor materials, lower cutting conditions of ~1 N load and ~500 rpm are typically sufficient.
A low-speed saw, as shown in Fig. 1(b), employing oil or kerosene as the coolant and lubricant may also be used; however, cutting dense ceramics at low rotational speeds (≈500 rpm) can be extremely slow. In all cases, the specimen (or blade) should be fed slowly and uniformly to avoid the formation of jagged or damaged cut surfaces. Any burrs formed during cutting should be removed using a coarse diamond grinding wheel (approximately 400 grit or 45 µm).
Sawing must be conducted with due care to minimize specimen damage, including overheating, the introduction of dislocations, deformation twinning, and surface cracking. Although ceramics are generally less susceptible to thermal damage than many metallic materials, the use of an appropriate liquid coolant is essential to control frictional heating. The coolant or lubricant should be selected such that the ceramic is chemically inert and insoluble in the medium.
When oil-based lubricants are employed, the specimen should be thoroughly cleaned after cutting using warm water and a mild detergent (e.g., Ivory, Micro-90) to remove residual oils. Distilled or deionized water should be used if the tap water is excessively hard. Prior to cleaning, it must be confirmed that the specimen is not water-soluble.
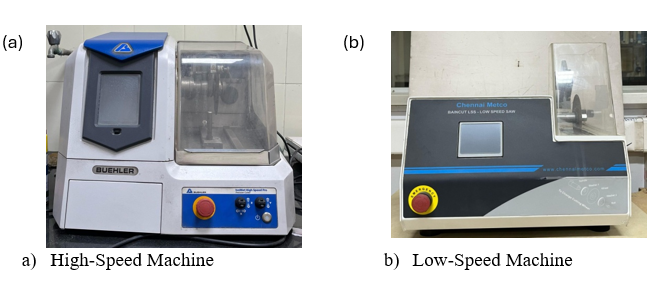
Figure 1: Images showing (a) a high-speed cut-off machine and (b) a low-speed saw machine.
2 Mounting :
Ceramic specimens may be mounted using two primary approaches, selected according to their density, mechanical integrity, and porosity. Dense ceramics are most effectively mounted using powdered thermosetting resins that polymerize under uniaxial compression, often containing fillers to improve edge retention and mechanical support. Traditional manual mounting presses operate on a screw or jack-based mechanism, whereas modern automated presses employ controlled heating, water cooling, and compressed air to achieve faster and more reproducible mounting cycles.
In contrast, fragile, porous, or friable ceramics are better suited for castable liquid resins, which polymerize through the addition of a catalyst or hardener. These resins provide gentle encapsulation and minimize mechanical damage during subsequent preparation steps. Common ceramic materials such as alumina (Al2O3), zirconia (ZrO2), and silicon carbide (SiC) can be mounted using either cold- or hot-mounting techniques. Cold mounting typically involves embedding the specimen in epoxy or acrylic resin and curing at room temperature or under mild heating (30–40 °C), making it suitable for all three ceramics by avoiding thermally induced stresses. Hot mounting involves pressing the specimen in a thermosetting resin, such as bakelite, at elevated temperatures (~180 °C) and pressures (250–300 bar) for several minutes. Although hot mounting provides excellent mechanical support and edge definition, careful control is required to prevent cracking or damage, particularly in brittle materials such as silicon carbide.
2.1 Compression Mounting :
Compression mounting is a technique used to encapsulate ceramic or metallic specimens in a hardened resin for easier handling during microstructural analysis. This method is ideal for dense, non-porous materials that can withstand heat and pressure without degradation. It can be done in two ways-
• Manual Hydraulic Mounting Press.
• Automatic Hydraulic Mounting Press.
The images of both the old-style and automatic mounting press are shown in Fig. 2.
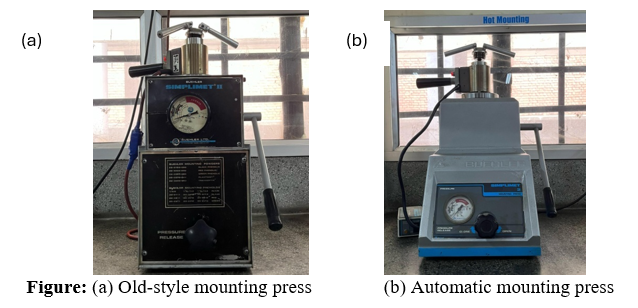
Figure 2: The manual (a) and automatic (b) hydraulic mounting press for compression mounting of ceramic specimens.
2.2 Castable Mounting (Cold mounting) :
Castable liquid resins are employed for mounting fragile, porous, or friable ceramic specimens, including refractory bricks, mineral sections, and microelectronic components. Various embedded ceramographic sections are shown in Fig. 3.
This approach, commonly referred to as cold mounting, involves an exothermic polymerization reaction with peak temperatures typically reaching ~120 °C, which is substantially lower than the ~150 °C encountered during compression (hot) mounting. Although unfilled castable resins exhibit relatively low abrasion resistance, this limitation can be mitigated by incorporating ceramic filler particles, thereby improving edge retention and wear resistance during subsequent grinding and polishing operations. Various types of compression-moulding resins, along with their fillers, characteristics, and applications, are provided in Table 1.
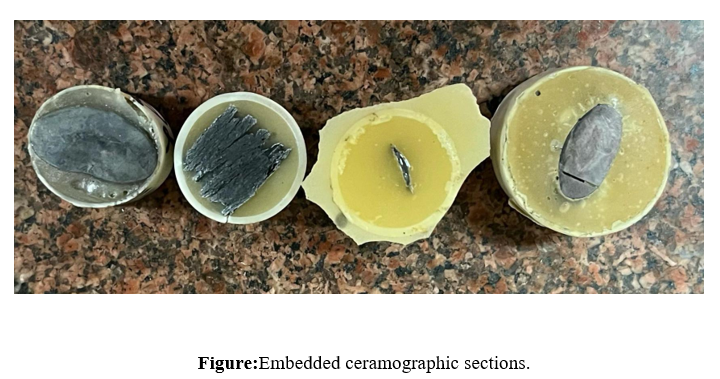
Figure 3: Images showing various embedded ceramographic sections
The below table provides information on different compression mounting resins, their fillers, characteristics, and applications.
.png)
Table 1: Various compression mounting resins, including their composition, fillers, key characteristics, and applications.
3 Grinding :
Grinding is a critical step in the preparation of ceramic specimens for microstructural characterization, as it produces a flat and uniformly smooth surface suitable for subsequent polishing and etching. Owing to the high hardness and brittleness of ceramics, improper grinding can introduce artifacts such as microcracks, edge chipping, and subsurface damage, which may obscure or distort the true microstructure. To minimize these effects, grinding is performed using a controlled, sequential abrasive process.
Grinding typically begins with a coarse silicon carbide (SiC) abrasive paper (≈240 grit) to remove sectioning damage and major surface irregularities. The specimen is then progressively ground using intermediate (400–600 grit) and fine (800–1200 grit) abrasives to gradually refine the surface and eliminate scratches from the previous step. The choice of grit size and progression is governed by the hardness of the ceramic and the required surface quality, with care taken to avoid excessive material removal.
Adequate lubrication, typically with water or alcohol-based fluids, is essential to limit heat generation, reduce friction, and prevent thermal stresses and surface contamination. Uniform pressure, consistent rotation speed, and proper specimen orientation must be maintained throughout grinding to ensure surface planarity and to prevent localized damage.
Effective grinding is essential for the success of subsequent polishing and etching stages. A properly ground ceramic specimen exhibits minimal subsurface damage, enabling accurate and high-resolution microstructural analysis using optical and electron microscopy techniques.
4 Polishing :
Polishing is a crucial step in ceramography to achieve a smooth, scratch-free surface for microscopic examination. After grinding, the ceramic sample undergoes a series of polishing stages using progressively finer abrasives. Diamond suspensions (6 µm, 3 µm, and 1 µm) are commonly used, followed by a final polish with colloidal silica (0.05 µm) to remove any residual scratches and enhance contrast. The polishing process must be carefully controlled to prevent surface damage, such as pull-outs or smearing, which can obscure microstructural features. Proper lubrication and controlled force ensure a high-quality finish suitable for optical and electron microscopy.
5 Etching :
Etching is a critical step in the microscopic characterization of ceramic materials, as it reveals key microstructural features such as grain boundaries, secondary phases, and defects that are not visible on a polished surface. Compared to metals, ceramics are generally more chemically inert, making etching more challenging and necessitating the use of material-specific etchants or thermal treatments. The primary objective of etching is to enhance contrast under optical or electron microscopy by selectively attacking specific phases or by generating surface relief, thereby enabling accurate assessment of grain morphology, phase distribution, and structural integrity. Proper etching is essential for reliable microstructural interpretation in quality control, failure analysis, and materials development.
In ceramography, two principal etching approaches are commonly employed: selective chemical etching and thermal etching. Chemical etching involves controlled surface corrosion using appropriate reagents, whereas thermal etching produces grain-boundary relief through high-temperature exposure without significant material removal.
For example, alumina (Al2O3) can be chemically etched by immersion in boiling concentrated phosphoric acid for 30-60 s, or thermally etched in air at approximately 1500 °C for 20–40 min. Prior to thermal etching, any polymeric mounting material must be removed. Alumina and alumina–magnesia (Al2O3–MgO) are typically thermally etched in air, whereas zirconia (ZrO2) is more often revealed by thermal etching or by chemical etchants based on mixtures of hydrofluoric and other mineral acids. Silicon carbide (SiC), owing to its high chemical stability, is preferentially etched using molten alkali-containing salts such as Na2CO3-K2CO3. Tungsten carbide (WC) in cemented carbides is typically etched with reagents containing nitric and hydrochloric acids (aqua regia–type etchants) or Murakami’s reagent. Silicon nitride (Si3N4) is usually thermally etched in high-purity nitrogen to prevent oxidation. Ultra-high-temperature ceramics such as zirconium diboride (ZrB2) are etched using strongly oxidizing acid mixtures that often include hydrofluoric acid, while titanium diboride (TiB2) is etched using selected organic acids (such as lactic acid) to produce controlled surface relief.
Each etching technique is selected based on the chemical stability, bonding characteristics, and microstructural features of the ceramic under investigation to ensure precise and reproducible microstructural characterization.
Etching of ceramic samples can be broadly classified into chemical etching, thermal etching, and plasma etching, each tailored to specific materials and analysis requirements. Below are the different types of etching techniques along with common etchants used for ceramic materials-
5.1 Chemical Etching :
Chemical etching is a widely employed technique in ceramography to enhance the visibility of microstructural features such as grain boundaries, phase distributions, and defects during microscopic examination. Because most ceramics are chemically inert, effective etching requires carefully selected reagents that can selectively attack specific phases or induce controlled surface relief. The process typically involves immersing a well-polished ceramic specimen in an appropriate chemical etchant that reacts preferentially with certain constituents of the material, thereby revealing the underlying microstructure.
The choice of etchant depends strongly on the ceramic composition. For example, alumina is commonly etched using hot concentrated phosphoric acid (H3PO4), whereas ZrO₂ may be etched using HF or mixtures of HCl and H2O2. Silicon-based ceramics such as SiC and Si3N4, owing to their high chemical stability, often require aggressive conditions like molten alkalis (e.g., NaOH or KOH) or fluorine-containing acids. Etching parameters such as time, temperature, and reagent concentration must be carefully controlled to avoid excessive material removal, surface damage, or misrepresentation of the true microstructure.
5.2 Thermal Etching :
Thermal etching is a microstructural revelation technique used for ceramic materials that avoids chemical reagents. In this method, a polished ceramic specimen is heated to a temperature slightly below its sintering temperature (typically 0.8–0.95 Tsinter), promoting surface diffusion and grain-boundary grooving. This controlled thermal treatment enhances the contrast of grain boundaries, phase distribution, and porosity during microscopic examination. Unlike chemical etching, thermal etching avoids extrinsic contamination or preferential chemical attack, making it ideal for intrinsic microstructural analysis. The technique excels for chemically inert ceramics such as Al2O3, SiC, and CeO₂. Fig. 4 shows a thermally etched scandia-stabilized zirconia sample.
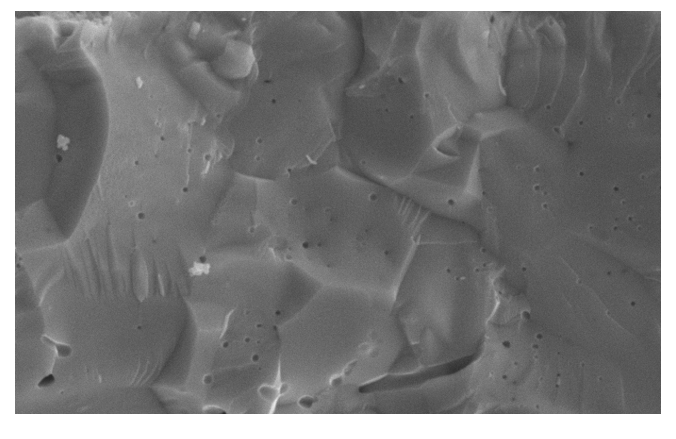
Figure 4. SEM micrograph of a thermally etched scandia-stabilised zirconia specimen.
5.3 Plasma Etching :
Plasma etching is an advanced, non-contact technique used to reveal ceramic microstructures by controlled surface modification with ionized gases. A polished specimen is exposed to low-pressure plasma from reactive gases such as oxygen, argon, CF₄, or SF₆, enabling selective interaction via physical sputtering and/or chemical reactions. This preferentially etches grain boundaries, secondary phases, or defect-rich regions, enhancing visibility of grain morphology, phase distribution, and porosity under optical or electron microscopy.
Compared to chemical etching, plasma etching provides superior etch depth control, uniformity, and selectivity without liquid chemicals that risk contamination or dissolution. It excels for chemically inert ceramics (SiC, Si3N